If you code in Java, I’m sure you’re familiar with JUnit. Although it’s not the only unit test framework out there, it’s probably the most popular, and has inspired a variety of similar frameworks for other languages.
In this tutorial, we’re going to examine some of the more advanced features of the newer versions of JUnit. In this part, we’re going to examine parameterized tests.
I’m sure you’ve run into situations in which you need to run a particular tests multiple times with slight variants on the inputs and outputs. Just to have something to actually run tests on, let’s consider a trivial complex number class:
public class Complex
{
	private final double x;
	private final double y;

	public Complex(double x, double y)
	{
		this.x = x;
		this.y = y;
	}

	public double getX()
	{
		return x;
	}

	public double getY()
	{
		return y;
	}

	public Complex add(Complex other)
	{
		return new Complex(x + other.x, y + other.y);
	}
}
We want to write tests to confirm that the add method is working as we expect. There are probably a variety of cases involving positive and negative numbers that we should test.
In “olden days,” we might have written something like this:
public class ParameterizedTestTheOldFashionedWay
{
	private static final double TOLERANCE = 0.00001;

	public ParameterizedTestTheOldFashionedWay()
	{
	}

	private static final Complex[][] ADD_CASES =
	{
		{
			new Complex(1, 1), new Complex(2, 2), new Complex(3, 3)
		},
		{
			new Complex(1, 1), new Complex(-1, -1), new Complex(0, 0)
		}
	};

	private void checkAddWorks(String test, Complex a, Complex b, Complex expected)
	{
		Complex actual = a.add(b);

		assertEquals(test, expected.getX(), actual.getX(), TOLERANCE);
		assertEquals(test, expected.getY(), actual.getY(), TOLERANCE);
	}

	@Test
	public void checkForwardAddWorks()
	{
		for (int i = 0; i < ADD_CASES.length; i++)
		{
			String test = "ADD_CASES[" + i + "] forward";

			checkAddWorks(test, ADD_CASES[i][0], ADD_CASES[i][1], ADD_CASES[i][2]);
		}
	}

	@Test
	public void checkReverseAddWorks()
	{
		for (int i = 0; i < ADD_CASES.length; i++)
		{
			String test = "ADD_CASES[" + i + "] reverse";

			checkAddWorks(test, ADD_CASES[i][1], ADD_CASES[i][0], ADD_CASES[i][2]);
		}
	}
}
Lines 9-17 define an array that provides our test data. In this case, each entry in the array is another array, with the two addends as the first two items and the expected result as the third. (Other types of tests might use a single “test data holder” object for each individual iteration.)
Lines 28-47 run the a+b and b+a tests using this data, and using a common checkAddWorks method that has refactored out the common code in the individual test. This method takes a test name which is constructed so that if a case fails we know which particular case we need to examine.
Now, this approach works, but it has a few problems. The biggest issue is that if a single case fails, none of the subsequent cases are run – the test is aborted right at that point. This means that if we somehow make a change that breaks many cases, we won’t know this right away – we may have to debug one case, only to find that then the next case fails. Essentially, this approach violates the general Test Driven Design principle that each unit test should test one and only one things. But, at least in the JUnit 3 days, this was the only way we had to table-drive tests.
When JUnit 4 came out, however, one thing it supported was parameterized tests. To make use of this feature, you had to take several steps:
- You annotate your test class with
@RunWith(value = Parameterized.class). This causes it to be run with a specialSuitethat implements the parameterization. - You provide a constructor in your test class that will take the various parameters you need to pass in. This constructor must save the parameters to member variables.
- You create a
staticmethod on your test class that will return the test parameters:- This method is identified by the
@Parametersannotation. - It returns
Collection. Each entry in theCollectionwill be the data for one iteration of the test. This entry will be an array ofObjects, one for each constructor argument in your test class.
- This method is identified by the
- You then write tests as required.
With this arrangement, JUnit will essentially run every test you have defined on the class for every parameter set you define. Thus, using this approach, we can write our add test as follows:
@RunWith(value = Parameterized.class)
public class ParameterizedTestClassConstructor
{
	private static final double TOLERANCE = 0.00001;

	private Complex a;
	private Complex b;
	private Complex expected;

	@Parameters
	public static Collection<Object[]> testParams()
	{
		Object[][] params =
		{
			{
				new Complex(1, 1), new Complex(2,2), new Complex(3,3)
			},
			{
				new Complex(2, 1), new Complex(4,2), new Complex(6,3)
			}
		};

		return Arrays.asList(params);
	}

	public ParameterizedTestClassConstructor(Complex a, Complex b, Complex expected)
	{
		this.a = a;
		this.b = b;
		this.expected = expected;
	}

	@Test
	public void checkForwardAddWorks()
	{
		Complex actual = a.add(b);

		assertEquals(expected.getX(), actual.getX(), TOLERANCE);
		assertEquals(expected.getY(), actual.getY(), TOLERANCE);
	}

	@Test
	public void checkReverseAddWorks()
	{
		Complex actual = b.add(a);

		assertEquals(expected.getX(), actual.getX(), TOLERANCE);
		assertEquals(expected.getY(), actual.getY(), TOLERANCE);
	}
}
Lines 33-49 provide the individual tests, each of which assumes that a, b and expected have been set up by the constructor. Lines 10-24 provide the actual creation of the Collection (a List in our case) of test parameters.
Using this arrangement, JUnit will run all the combinations, even if one or more of them fails. It also provides reasonable feedback to allow you to locate a failing test by test name and the index into the data. Here’s what the test execution result looks like in Eclipse, for example:
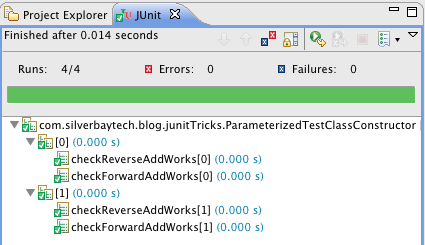
As you can see, the individual cases are organized by the index of the case, followed by the individual test. If one of the cases failed, it will be indicated appropriately, allowing you to zero in on what’s wrong.
The “all the tests with all the data” approach may not actually be that suitable for the kinds of tests shown here. Many people prefer to have a single test class for each “class under test,” and this approach doesn’t lend itself to that. There are other situations, however, where it is just the ticket. As one example, it could be something more “environmental.”
As one example, consider website testing with Selenium. Selenium is a framework for testing web sites using real browsers. Using Selenium Web Driver, you can “remote control” a browser, simulating clicks, button presses, etc. and then inspecting the web pages that come back. It’s a wonderful tool for automatically exercising web sites. Since it uses real browsers, it allows for testing associated with all the quirks exposed by real browsers.
Because each individual browser needs to be remote controlled in a somewhat different way, each has its own specific web driver class. If you are trying to support multiple browsers for your web site, you presumably want to run all of your unit tests using all of the browsers. JUnit’s support for parameterized tests is perfect for something this. Conceptually, you could write your test something like this:
@RunWith(value = Parameterized.class)
public class ParameterizedWebDriverTest
{
	private WebDriver driver;

	@Parameters
	public static Collection<Object[]> testParams()
	{
		Object[][] params =
		{
			{	FirefoxDriver.class	},
			{	SafariDriver.class	},
			{	ChromeDriver.class	},
			{	InternetExplorerDriver.class	}
		};

		return Arrays.asList(params);
	}

	public ParameterizedWebDriverTest(Class<? extends WebDriver> driverClass) throws Exception
	{
		this.driver = driverClass.newInstance();
	}

	@Test
	public void checkPageTitle()
	{
		driver.get("http://google.com");
		assertTrue(driver.getTitle().contains("Google"));
	}

	/* more tests ... */
}
Note that we pass in the class, not a live object. JUnit only calls the @Parameters-annotated method once. Thus, if we instantiated driver objects in that method, the same object would get used over and over again for each test. This could create test-to-test coupling, which we probably don’t want. This is one issue with JUnit’s approach – the objects in the parameters Collection are not re-created with each test. As a result, you have to be careful about side effects on those objects. To keep spooky things from happening, they really should be invariants.
For some folks, JUnit’s support for parameterized tests is to limiting. They would rather have something closer to the “old fashioned” approach I showed you at the beginning, where individual tests could be run with different sets of parameters. Enter the junitparams project at https://code.google.com/p/junitparams/. This is a JUnit extension that allows you to define parameters on a method-by-method basis within an individual test file.
With junitparams:
- You annotate your test class with
@RunWith(JUnitParamsRunner.class)so that it is run using their customSuiteclass. - Any test method that is to have parameters is annotated with their
@Parametersannotation (not the same one as JUnit’s). - You write the test methods to take the appropriate parameters.
JunitParamsRunner will then invoke each of these methods once with each of the parameter sets. Note that not every test method must be parameterized – you can mix the use of parameters with more “vanilla” test methods.
With this package, you have three ways of providing parameters:
First, if your parameters can be expressed as primitives, you can provide them directly in the @Parameters annotation. This annotation can take an array of strings, each of which contains a comma-separated (or pipe-separated) list of parameters. junitparams will handle coercing the substrings into the appropriate types. Thus, you could write a test as follows:
	@Test
	@Parameters(
	{
		"1,1,2,2,3,3", "4|1|2|2|6|3"
	})
	public void checkForwardAddWorksWithParameters(	double ax,
													double ay,
													double bx,
													double by,
													double expectedX,
													double expectedY)
	{
		Complex a = new Complex(ax, ay);
		Complex b = new Complex(bx, by);
		Complex expected = new Complex(expectedX, expectedY);
		Complex actual = a.add(b);

		assertEquals(expected.getX(), actual.getX(), TOLERANCE);
		assertEquals(expected.getY(), actual.getY(), TOLERANCE);
	}
If you were restricted to primitives, this package wouldn’t be terribly interesting. Thus, junitparams provides a second method that is very similar to JUnit’s. You provide method that returns an array of arrays as a member variable, and then name the method in the @Parameters annotation:
	protected Object[] paramsForObjectTest()
	{
		return new Object[]
		{
			new Object[]
			{
				new Complex(1, 1), new Complex(2, 2), new Complex(3, 3)
			},
			new Object[]
			{
				new Complex(2, 1), new Complex(4, 2), new Complex(6, 3)
			}
		};
	}

	@Test
	@Parameters(method = "paramsForObjectTest")
	public void checkForwardAddWorksWithyObjects(Complex a, Complex b, Complex expected)
	{
		Complex actual = a.add(b);

		assertEquals(expected.getX(), actual.getX(), TOLERANCE);
		assertEquals(expected.getY(), actual.getY(), TOLERANCE);
	}
Note that the outer Object array is a simple array, not a doubly-subscripted array as with JUnit’s approach. The method can be private – junitparams can dig into your class and find it. I find, however, that this results in warnings about unused private methods, since the Java compiler doesn’t realize that reflection tricks are being played. Thus, I tend to declare it as protected or with “package” access.
All that new Object[] notation is a bit of a nuisance to write, so junitparams provides a static method named $ that helps you create the arrays. This allows some syntactical sugar:
import static junitparams.JUnitParamsRunner.$;
...

	protected Object[] simplifiedNotationForObjectParameters()
	{
		return $(	$(new Complex(1, 1), new Complex(2, 2), new Complex(3, 3)),
					$(new Complex(2, 1), new Complex(4, 2), new Complex(6, 3)));
	}

	@Test
	@Parameters(method = "simplifiedNotationForObjectParameters")
	public void anotherCheckForwardAddWorksWithObjects(Complex a, Complex b, Complex expected)
	{
		Complex actual = a.add(b);

		assertEquals(expected.getX(), actual.getX(), TOLERANCE);
		assertEquals(expected.getY(), actual.getY(), TOLERANCE);
	}
There’s no difference between this setup and the previous one other than the way that we’ve declared the data – the $(...) method simply takes a variable-length list of Objects and returns the corresponding array.
Finally, if it is more convenient, you can declare a “provider” class that will provide your parameters instead of doing it via a method:
	@Test
	@Parameters(source = ParameterizedMethodDataProvider.class)
	public void checkForwardAddWorksWithClassProvider(Complex a, Complex b, Complex expected)
	{
		Complex actual = a.add(b);

		assertEquals(expected.getX(), actual.getX(), TOLERANCE);
		assertEquals(expected.getY(), actual.getY(), TOLERANCE);
	}
The corresponding ParameterizedMethodDataProvider might look something like this:
import static junitparams.JUnitParamsRunner.$;

public class ParameterizedMethodDataProvider
{
	public static Object[] providePositiveCases()
	{
		return $(	$(new Complex(1, 1), new Complex(2, 2), new Complex(3, 3)),
					$(new Complex(2, 1), new Complex(4, 2), new Complex(6, 3)));
	}

	public static Object[] provideNegativeCases()
	{
		return $(	$(new Complex(-1, -1), new Complex(-2, -2), new Complex(-3, -3)),
					$(new Complex(-2, -1), new Complex(-4, -2), new Complex(-6, -3)));
	}
}
The important part is that the class must have one or more static methods whose names begin with provide, and which return the appropriate array of Object arrays. If you provide more than one such method, all of them are used.
As with the native JUnit approach, junitparams will call each test method with each set of parameters, recording which cases succeed and which fail. Remember how JUnit organized first by index and then by test method? junitparams does it the other way around:
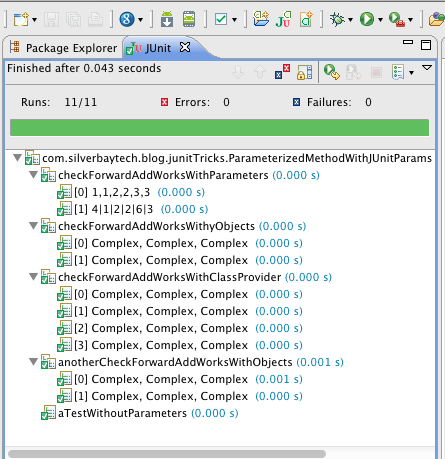
but still provides you with the index numbers to help you determine which particular combination of parameters fail if something goes wrong.
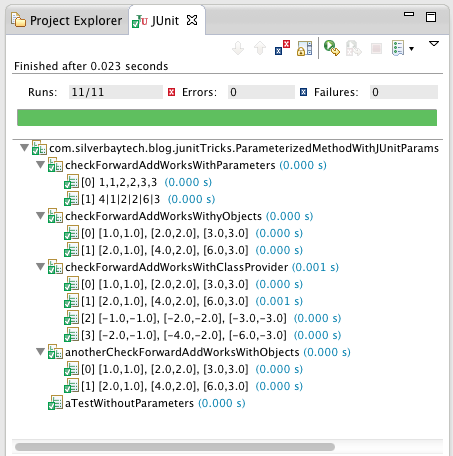
EDIT: Pawel Lipinski, author of JUnitParams, was kind enough to point out that you can do better than just the test index number. JUnitParams uses the toString method on the test parameters as part of the display. As such, if the Complex method implements a toString method, you can see the toString representation of each parameter. I updated my Complex class to display its contents in the format [x,y], and the JUnit results then end up looking as follows:
That’s about it for parameterized tests. The sample code for this tutorial can be found on GitHub.
In Part 2 of this tutorial, we will look at JUnit’s Rule support.