In Part 1 of this tutorial, I made some general comments about how I tend to approach unit testing iOS code. Now we’re going to begin applying these techniques to a real application. As we do this, we will make some changes to the application’s structure to make it more testable. The source code for this tutorial may be found on GitHub. This part’s code is in the Version1 directory.
To start out, let’s look at the initial version of our application.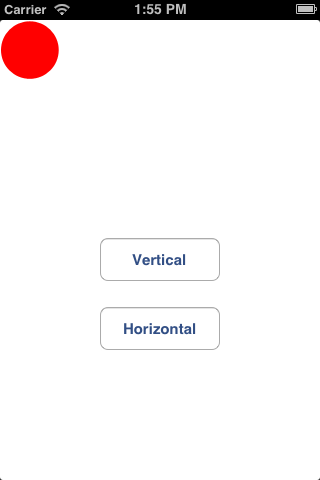
The application is pretty simple. There is a red ball in the upper left. When you push the button labeled “Horizontal”, the ball will animate across the screen horizontally, “bounce” off the right edge of the screen and then return home. If you press the “Vertical” button, it will do the same vertically. When the ball “hits” the far edge of the screen, a “bounce” sound will be played. While the animation is in progress, both buttons are hidden – they are to reappear when the animation is complete.
The initial version of the application may be found in the Version1 folder in the GitHub archive. All the “interesting” logic is in the SBViewController class.
SBViewController.h looks like this:
@interface SBViewController : UIViewController
@property (weak, nonatomic) IBOutlet UIImageView *ballImageView;
@property (weak, nonatomic) IBOutlet UIButton *verticalButton;
@property (weak, nonatomic) IBOutlet UIButton *horizontalButton;

- (IBAction)onVerticalButtonPressed:(id)sender;
- (IBAction)onHorizontalButtonPressed:(id)sender;
@end
Nothing particularly surprising here – we have outlets for each of the three on-screen items, and action methods for each of the buttons being pressed.
The initial version of SBViewController.m that we’ve been handed looks like this:
#import "SBViewController.h"
#import <AudioToolbox/AudioToolbox.h>

@implementation SBViewController
{
    CGPoint         _ballHome;  // ball's home position
    SystemSoundID   _soundID;   // ID for bounce sound
}

- (void) viewDidLoad
{
    [super viewDidLoad];

    _ballHome = self.ballImageView.center;

    // load the sound
    NSString *soundFilePath = [[NSBundle bundleForClass:[self class]] pathForResource:@"bounce" ofType:@"mp3"];
    NSURL *soundFileURL = [NSURL fileURLWithPath:soundFilePath];
    OSStatus status = AudioServicesCreateSystemSoundID((__bridge CFURLRef)soundFileURL, &_soundID);
    NSAssert(status == 0, @"unexpected status: %ld", status);
}

- (void) viewDidUnload
{
    // unload the sound
    AudioServicesDisposeSystemSoundID(_soundID);
    _soundID = 0;

    [super viewDidUnload];
}

// start bounce toward bottom
- (IBAction)onVerticalButtonPressed:(id)sender
{
    // Destination is bottom edge of screen minus radius of ball
    CGSize ballSize = self.ballImageView.bounds.size;
    CGSize viewSize = self.view.bounds.size;
    CGPoint dest = CGPointMake(_ballHome.x, viewSize.height - ballSize.height / 2);
    [self bounceBallTo:dest];
}

// start bounce toward top.
- (IBAction)onHorizontalButtonPressed:(id)sender
{
    // Destination is right edge of screen minus radius of ball
    CGSize ballSize = self.ballImageView.bounds.size;
    CGSize viewSize = self.view.bounds.size;
    CGPoint dest = CGPointMake(viewSize.width - ballSize.width / 2, _ballHome.y);
    [self bounceBallTo:dest];
}

- (void) bounceBallTo:(CGPoint) dest
{
    self.verticalButton.hidden = YES;
    self.horizontalButton.hidden = YES;

    [UIView animateWithDuration:2.0
                     animations:^(void)
                     {
                         self.ballImageView.center = dest;
                     }
                     completion:^(BOOL finished)
                     {
                         AudioServicesPlaySystemSound(_soundID);

                         [UIView animateWithDuration:2.0
                                          animations:^(void)
                                          {
                                              self.ballImageView.center = _ballHome;
                                          }
                                          completion:^(BOOL finished)
                                          {
                                              self.verticalButton.hidden = NO;
                                              self.horizontalButton.hidden = NO;
                                          }];
                     }];
}
@end
Looking through the code, we observe the following:
- On line 6, we have a point that represents the ball’s “home” position, initialized on line 14 when the view loads. Note that we’re going to animate the ball based on its center position.
- We also, at least for now, are using the
AudioToolboxroutines to play our sound. Thus, we have an ID for the sound on line 7, we load the sound file frombounce.mp3on lines 17-20, and, being good citizens, we clean up behind ourselves, releasing the sound on lines 26-27, making sure to “zero-out” the variable containing the ID after we release the sound. - We observe that the coder that wrote this did at least apply a little DRY (Don’t Repeat Yourself), and combined the logic for horizontal and vertical motion into a single
bounceBallTo:routine, which takes the destination to which the ball should animate. onVerticalButtonPressed:andonHorizontalButtonPressed:compute the “far end” of the animation, and then callbounceBallTo:- As expected,
bounceBallTo:is usingUIView‘sanimateWithDuration:animations:completion:method in order to perform the animations. We expect that for at least two reasons:- We know that we’re going to have to need to know when the first part of the animation is complete, because we need to play the sound at that point.
- We need to now when the entire animation is complete, because we have to re-enable the buttons.
Now, I don’t know about you, but a first look at bounceBallTo: exhibits a number of “code smells:”
- The whole nested animation-within-an-animation seems to be coded correctly, but isn’t horribly intuitive, nor does it look easy to test.
- More telling, the completion blocks have boolean parameters which are being ignored. That tells me right away that there are probably bugs lurking in this code.
- Although our original coder was smart enough to make both the horizontal and vertical cases use a common routine, that routine has a bit of a DRY smell, in that the two nested calls to
animateWithDuration:animations:completion:look pretty similar. - This code may be difficult to expand upon if we get new feature requests, which we have. Marketing has decided that they need an animation that has four segments instead of two – the ball should trace a rectangle around the screen. Thus, obviously, the implementation of
bounceTo:isn’t going to cut it. That being said, the YAGNI (You Ain’t Gonna Need It principle makes this implementation at least somewhat reasonable initially, so we won’t throw bricks at its author for that.
If you load up this project in the emulator and run it, you will notice the following:
- The first time you run the bounce, you’ll probably notice that the sound plays after the ball has already started its return trip. Later invocations work OK, however. This is a symptom of the fact that an MP3 needs some setup in order to play, and the very first time we try to play the sound, this hasn’t been done. We’ll address this later on.
- Although the application handles disabling the controls once an animation is started, it doesn’t deal with other “system events” well. For example, try this:
- Start an animation
- While the ball is beginning its movement, press the “Home” button on the emulator.
What you will probably notice is that the application still plays the “bounce” sound while it’s in the background. That sounds like a bug to me.
- Having done that, now invoke the application again by tapping its icon. What you’ll probably see is that the screen re-appears with the ball in the far position (lower left or upper right), and then the ball instantly jumps to the upper left. Again, not pretty, and possibly a bug.
Now, the latter two bits of behavior may be a failure in requirements – it’s possible the application’s designers never thought of this particular situation. Let us suppose we take those issues to Marketing, and they say, “oh, if that happens, we want the whole process aborted, and when the app comes back, it should appear just as it did when it first launched.” Having a degree of forethought, we also ask “What should happen if the user tries to do this while a phone call is in progress?” “Oh, wow,” says Marketing. “We didn’t think of that – if that happens, we want the on-screen animation to happen, but we want the sound suppressed.”
So, clearly, we have our work cut out for us. In the Part 3 of this tutorial, we’re going to begin the process of testing our app.