In designing web applications, CAPTCHA tests are sometimes necessary to help prevent Bad People from automating attacks on your site. reCAPTCHA, a free service offered by Google, is a popular CAPTCHA service. While reCAPTCHA provides “plugins” for many client technologies, Google Web Toolkit (GWT) isn’t one of them. Fortunately, it’s quite straightforward to integrate using the reCAPTCHA AJAX API.
A GWT-based site on which I am working has a “forgot password” function. In order to reset a password you have forgotten, you provide your email address, and are sent a code that then authorizes you to reset your password. If the server-side service only required the email address be submitted, a Black Hat could create a nuisance by submitting addresses over and over again to generate lots of “reset code” emails. To try to inhibit that, we added a CAPTCHA as well.
Here’s what the dialog box looks like when it’s done:
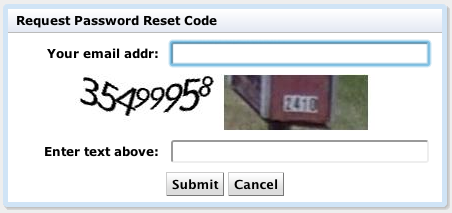
One of the things to note is that I’m using a “custom” reCAPTCHA theme. This allows me to style things the way I want, but requires that I provide some specific bits and pieces in the HTML.
Step 1: Include the reCAPTCHA AJAX script.
In the GWT application’s host page, include the following script:
<script type="text/javascript"
   src="http://www.google.com/recaptcha/api/js/recaptcha_ajax.js"></script>
This defines a JavaScript object named Recaptcha through which you can obtain a CAPTCHA image.
Step 2: Set up the dialog, with the required elements, in UiBinder
My UiBinder file looks like this:
<!DOCTYPE ui:UiBinder SYSTEM "http://dl.google.com/gwt/DTD/xhtml.ent">
<ui:UiBinder xmlns:ui="urn:ui:com.google.gwt.uibinder"
	xmlns:g="urn:import:com.google.gwt.user.client.ui"
	xmlns:c="urn:import:com.google.gwt.user.cellview.client">

	<g:HTMLPanel addStyleNames="q-dialog q-passwordResetRequestDialog">
		<table class="q-form">
			<tbody>
				<tr>
					<td class="q-formLabel"><label>Your email addr:</label></td>
					<td class="q-formValue"><g:TextBox ui:field="emailTextBox"/></td>
				</tr>
				<tr>
				    <td colspan="2"><div id="recaptcha_image"></div></td>
				</tr>
				<tr>
					<td class="q-formLabel"><label>Enter text above:</label></td>
					<td class="q-formValue"><g:TextBox ui:field="captchaTextBox"/></td>
				</tr>
				<tr>
					<td colspan="2" class="q-formButtons">
					    <g:Button text="Submit" ui:field="submitButton" />
					    <g:Button text="Cancel" ui:field="cancelButton" />
					</td>
				</tr>
			</tbody>
		</table>
	</g:HTMLPanel>
</ui:UiBinder>
There are two critical elements. The first is line 14, highlighted above – using a custom theme in reCAPTCHA requires that you provide a div with the id recaptcha_image. This is how reCAPTCHA knows where to place the image.
The second element is on line 18, also highlighted above. reCAPTCHA requires you to provide an input into which the user will type the contents of the image. There’s a catch – reCAPTCHA requires this input field to have a name of recaptcha_response_field. Even though my approach extracts the response “manually” and verifies it elsewhere, reCAPTCHA won’t display the CAPTCHA image unless this field is set up properly. (Thanks to Keith for pointing out that I omitted to mention this in the first version of this post.) To handle this, the constructor for the dialog includes the following:
captchaTextBox.getElement().setId("recaptcha_response_field");
captchaTextBox.setName("recaptcha_response_field");
Setting the id as well as the name may be unnecessary – I included it for paranoia.
Step 3: Call the Recaptcha.create function to get an image
In the Java code associated with the dialog, I include the following “native” function:
	private native void showCaptcha(String publicKey)
	/*-{
		$wnd.Recaptcha.create(publicKey, "", {
			"theme" : "custom"
		});
	}-*/;
As part of constructing the dialog box, I call this with the public key I obtained from the reCAPTCHA site. The Recaptcha.create function takes the following parameters:
- Your reCAPTCHA public key.
- JavaScript Element object or the string ID of the element in your HTML document.
- JavaScript dictionary with options.
The second parameter is normally used when you want reCAPTCHA to put a fully-themed reCAPTCHA box into your page. When using a custom theme, this value isn’t used, and so can be passed an empty string.
Note the use of $wnd – this is how you access “global” JavaScript variables in GWT – i.e. those that are children of the top-level Window object. If you omit this, the JavaScript will be looking in the wrong context for the Recaptcha object.
Once you’ve done that, the Recaptcha.create method transforms your div to look something like this:
<div id="recaptcha_image" style="width: 300px; height: 57px;">
    <img style="display:block;" alt="reCAPTCHA challenge image"
         height="57" width="300"
         src="http://www.google.com/recaptcha/api/image?c=A-BIG-LONG-STRING">
</div>
Note in particular the style attribute that gets added to your div. I had originally (via an external style sheet) styled the div with text-align: center, expecting the image to then be centered in what I thought would be a full-width div. As you can see, however, reCAPTCHA modifies the div itself, adjusting its width. Thus, to get things centered, I had to instead use an auto margin on the left and the right of the div so that it would then center in its parent.
Step 4: Collect the challenge when the dialog is submitted.
In order to validate the user’s submission, you have to have three things:
- The user’s response. This is easily obtainable using the
TextBoxwe defined. - The “challenge string” associated with the image. This is a specially-coded string that identifies the specific CAPTCHA image to the reCAPTCHA service.
- The user’s IP address. Google apparently tracks this when it issues the image, and wants it back from you in order to match things up. Your back end web service can capture this when you submit the dialog results.
So, the only critical thing is to get the challenge string, which Recaptcha keeps tucked away somewhere. (This value gets updated if you refresh the CAPTCHA image, since the challenge string is image-specific.)
Again, this can be done with a simple bit of Java/JavaScript code:
	private native String getCaptchaChallenge()
	/*-{
		return $wnd.Recaptcha.get_challenge();
	}-*/;
Step 5: Clean up behind yourself
And, finally, a bit to call just before hide-ing the dialog:
	private native void destroyCaptcha()
	/*-{
		$wnd.Recaptcha.destroy();
	}-*/;
The reCAPTCHA documentation has the following to say about destroy():
In the AJAX API, destroy() removes the reCAPTCHA widget from the element (sets the element’s innerHTML to the empty string) and also resets some internal state. You need to use this if the user cancels out of a dialog and you want to cleanly remove the widget from the page.
In standard web applications, cleaning up behind yourself may not be quite so critical, since you’re likely to a completely new page as soon as you submit a form or whatever. In GWT, however, everything is (usually) hosted within a single web page, so cleaning up after yourself is A Very Good Thing.
Step 6: Validate the CAPTCHA
Once you have obtained the data, it’s pretty straight-forward to submit it to the server and validate it on that side using the Java plug-in that is available via the reCAPTCHA site.
This example doesn’t have all the bells and whistles you might want to include. For example reCAPTCHA allows you to ask for a replacement image (in case the user can’t figure out the one presented) or to switch between image-based and audio-based CAPTCHAs for people with disabilities. Again, the Recaptcha object has methods on it that allow you to perform these functions which can be called in the same way as the other methods shown above.