In Part 1 of this tutorial, we looked at performing parameterized tests in JUnit. In this portion, we will look at a more recent addition to JUnit – Rules.
If you’ve been using JUnit, you’re almost certainly familiar with its @Before and @After annotations. A method annotated with @Before is run just before each test method is called, and a method annotated with @After is run just afterwards.
One obvious use of these methods is pre-test setup and post-test cleanup. Indeed, in JUnit 3, the methods were named setUp and tearDown. One alternate use of the @After method, however, it to do common “check that things went right” testing. As one example, if you are using mock objects from packages such as EasyMock, you might take the approach of calling verify on each of your mocks from the @After method. This saves you from having to remember to call verify in each and every test method. (Some people believe that this is poor test design. I’m not going to argue the point one way or another – I’m just going to say that in my experience it’s not uncommon.)
This approach has a problem however. The @After method is called after the test method whether or not the method succeeded. If something in the body of a test fails, it doesn’t usually make sense to verify your mocks, since we already know that we have a failure. In addition, if the test failed, it is quite likely that mock is also going to fail to verify, throwing additional exceptions. “Piling on” those errors may obscure exactly what went wrong.
Let’s set up a deliberately-simplified example:
public class ProblemsWithBeforeAfter
{
	private String stringThatShouldBeEvenLength;

	public ProblemsWithBeforeAfter()
	{
	}

	@Before
	public void before()
	{
		System.out.println("before");
	}

	@After
	public void checkCommonResultsAfterEachTest()
	{
		System.out.println("after");

		assertTrue(stringThatShouldBeEvenLength.length() % 2 == 0);
	}

	@Test
	public void aTestThatWorks()
	{
		System.out.println("aTestThatWorks");
		stringThatShouldBeEvenLength = "1234";
	}

	@Test
	public void aTestThatFailsUnexpectedly()
	{
		System.out.println("aTestThatFailsUnexpectedly");
		fail("test fails unexpectedly and doesn't set 'stringThatShouldBeEvenLength'");
	}
}
Here, each of the test cases is nominally supposed to end up outputting a string that is supposed to be of even length, so the length verification has been put into the @After method. The second test case, however, simulates a test method that fails unexpectedly, and thus doesn’t output the string. If you execute this test class, you will see the following on the console:
before
aTestThatWorks
after
before
aTestThatFailsUnexpectedly
after
This is as expected. JUnit will correctly indicate that the test has failed:
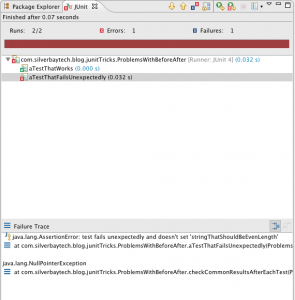
but you can see that in addition to the failure, we’ve generated a NullPointerException that is the result of the @After method being called when its expectations were not met. This is distracting noise in the tests. Ideally, we’d like to run the verification only if the test passed. Unfortunately, you can’t do this, because the @After method doesn’t have access to the success or failure of the test.
As soon as you start talking about “I’d like to do X just after each method” or similar things, somebody’s going to shout out “Aspect Oriented Programming” or “AOP.” This is exactly the kind of thing that AOP was designed for. The @Before and @After annotations were a valuable step towards this, but are not fully generalized. JUnit’s Rule support, introduced in JUnit 4.8, is a much more “pure” AOP approach.
First, some concepts. At least as it pertains to Rules, JUnit represents each individual test invocation as a Statement. A Statement represents the class instance and specific method associated with that test. Thus, running tests consists of creating and invoking Statements. Statement is actually an interface, and has only one method – evaluate. What a Rule does is to allow you to intercept each Statement and, if you wish, wrap it up in another Statement that does stuff before and/or after the nested Statement is evaluated. In AOP-ese, this is providing “around advice” (the extra “before or after stuff”) on a “join point” (the individual test execution). Because your code now surrounds the invocation of the test method, you have much more control on exactly what happens before and after.
Here’s an example of how we could fix the problem we mentioned earlier with a Rule:
public class RulesInsteadOfBeforeAfter
{
	@Rule public PostCheckRule rule = new PostCheckRule();

	private String stringThatShouldBeEvenLength;

	public RulesInsteadOfBeforeAfter()
	{
	}

	@Test
	public void aTestThatWorks()
	{
		System.out.println("aTestThatWorks");
		stringThatShouldBeEvenLength = "1234";
	}

	@Test
	public void aTestThatFailsUnexpectedly()
	{
		System.out.println("aTestThatFailsUnexpectedly");
		fail("test fails unexpectedly and doesn't set 'stringThatShouldBeEvenLength'");
	}

	private class PostCheckRule implements TestRule
	{
		public PostCheckRule()
		{
		}

		public Statement apply(final Statement base, Description description)
		{
			return new Statement()
			{
				@Override
				public void evaluate() throws Throwable
				{
					System.out.println("before");
					base.evaluate();
					System.out.println("after");
					assertTrue(stringThatShouldBeEvenLength.length() % 2 == 0);
				}
			};
		}
	}
}
As you can see, on line 3 we have a public member variable annotated as a @Rule. Our PostCheckRule implements the JUnit TestRule interface as required. (In older versions of JUnit this was called MethodRule. MethodRule is still supported, but is deprecated.) TestRule has a single method named apply which, as you might expect, applies the rule to the Statement that is about to be evaluated. The apply method is passed the original Statement, and is expected to return a Statement that will result in the rule being applied. In our case, what we do is create a new Statement that prints "before", evaluates the original Statement, and then prints "after" and runs our check.
If we run this test class, we will see the following printed to the console:
before
aTestThatWorks
after
before
aTestThatFailsUnexpectedly
Note the omission of the final after. JUnit tests “fail” by throwing an exception, so when aTestThatFailsUnexpectedly fails, the exception causes the remainder of our custom Statement to be skipped. Of course, if it had been important for us to catch the error we could have. Thus, instead of skipping code if a test failed, we could have inserted code that only ran if the test failed by wrapping the base.evaluate call in a try/catch block. One practical example I’ve seen involves Selenium Web Driver, in which a screen shot of the offending web page is captured and logged when, and only when, a test fails.
Although this was perhaps a somewhat weak example, there are other things you can do with a Rule. The Description parameter passed to apply provides convenient access to information about the test Statement. One piece of information that can be useful on occasion are the annotations on individual test methods.
Suppose that we had a test class that required some kind of initialization on a test-by-test basis. Clearly, of course, we can do this using @Before methods, but what if the specific details of the initialization needed to be somewhat different from test method to test method? In this case, we’d have to put the initialization code (or calls to helper methods) in each and every test method. What if we could instead just annotate each method with the configuration it needed, and then create reusable code that would do the setup? Here’s an example:
@Target(ElementType.METHOD)
@Retention(RetentionPolicy.RUNTIME)
@interface Configuration
{
	String value();
}

public class RulesThatCheckAnnotations
{
	@Rule
	public ConfigurationRule configurationRule = new ConfigurationRule();

	private String config;

	public RulesThatCheckAnnotations()
	{
	}

	@Configuration("1")
	@Test
	public void firstConfiguration()
	{
		assertEquals("config1", config);
	}

	@Configuration("2")
	@Test
	public void secondConfiguration()
	{
		assertEquals("config2", config);
	}

	private class ConfigurationRule implements TestRule
	{
		public ConfigurationRule()
		{
		}

		public Statement apply(final Statement base, final Description description)
		{
			return new Statement()
			{
				@Override
				public void evaluate() throws Throwable
				{
					Configuration configuration = description.getAnnotation(Configuration.class);
					config = "config" + configuration.value();
					base.evaluate();
				}
			};
		}
	}
}
Lines 1-6 define the @Configuration annotation we will use. In production use, of course, this would probably be in its own file, but we’ve included it here for simplicity. The two test methods are then each annotated with different values simulating the different configuration they expect.
As before, our ConfigurationRule creates a new Statement that wraps the original one. Here, it uses the description parameter to locate the Configuration annotation on the test method, and then uses information from that in order to do the configuration. In this simplistic example, it just populates a variable in the original test class, but obviously we could do just about anything required in terms of configuration.
If having extra capabilities isn’t enough, another of the advantages of using TestRule classes instead of @Before/@After coding is reusability. Properly designed, a TestRule class can be made reusable across test classes or projects. JUnit ships with a number of pre-defined TestRule classes, including:
ErrorCollector: collects multiple errors in one test methodExpectedException: makes flexible assertions about thrown exceptionsExternalResource: start and stop a server, for exampleTemporaryFolder: create fresh files, and delete after testTestName: remembers the test name for use during the methodTestWatcher: adds logic at events during method executionTimeout: causes test to fail after a set timeVerifier: fails test if object state ends up incorrect
In AOP programming, you are not limited to a single piece of advice on a join point. This is true with JUnit rules as well. Here, we have a test class that implements two different rules:
public class RulesMultiple
{
	@Rule public MyRule one = new MyRule("one");
	@Rule public MyRule two = new MyRule("two");

	public RulesMultiple()
	{
	}

	@Test
	public void theTest()
	{
		System.out.println("test");
	}

	private class MyRule implements TestRule
	{
		private String name;

		public MyRule(String name)
		{
			this.name = name;
		}

		public Statement apply(final Statement base, final Description description)
		{
			return new Statement()
			{
				@Override
				public void evaluate() throws Throwable
				{
					System.out.println(name + " before");
					base.evaluate();
					System.out.println(name + " after");
				}
			};
		}
	}
}
If a test class has more than one Rule, all the rules will be concatenated. Thus, when I execute this test class, I see the following on the console:
two before
one before
test
one after
two after
When used this way, the order in which the rules is applied is not defined, so you might just as easily see
one before
two before
test
two after
one after
For many situations, the order may not make any difference. If they do, however, JUnit provides a convenient RuleChain class that provides deterministic ordering. Thus, if the pair of rules in the previous example were rewritten as
	@Rule
    public TestRule chain= RuleChain
                           .outerRule(new MyRule("outer"))
                           .around(new MyRule("inner"));
we would always be guaranteed to receive
outer before
inner before
test
inner after
outer after
Multiple .around invocations are supported, allowing rules to be nested as deeply as desired.
Finally:
- The examples above have focused on the
@Ruleannotation, which gives us access to theStatementassociated with an individual test method. There is also a@ClassRuleannotation that defines a rule at the class level. This gives access to aStatementassociated with an entire class, providing the same type of AOP support that the@BeforeClassand@AfterClassannotations do. - I mentioned that the fields annotated as
@Rulemust bepublic. Although the folks at JUnit could have gone spelunking inside our test classes to search forprivatefields, apparently they decided that was either not worth the effort, or they knew of cases in which that wouldn’t work. So, for the moment, the fields must bepublic. (public staticfor@ClassRule-annotated fields.) Rulesupport and@Before/@Aftersupport can be combined. Code annotated as either@Beforeor@Afteris executed inside that for aTestRule. Thus, you can think of theStatementpassed to the inner-mostTestRuleas encapsulating both the test method and any@Beforeor@Aftermethods. Similarly,@BeforeClassand@AfterClassprocessing are doine within theStatementprovided to a@ClassRule.
Note that I’m not advocating that we completely discard @Before and @After annotations. In many cases they are perfectly adequate and, being a little more familiar to programmers, perhaps more obvious. But it’s nice to know that, when necessary, you have a more powerful tool available.
In Part 3 of this tutorial, we will cover JUnit’s assume functionality.